| Notes on Inletting a Barrel |
Back |
 How you inlet a barrel depends a lot on the type of barrel and your
tools. Any barrel can be completely inlet with knives, chisels, and
rasps. Some fitting will always need to be done with chisels and
rasps. However, that is the most difficult and time consuming way to do
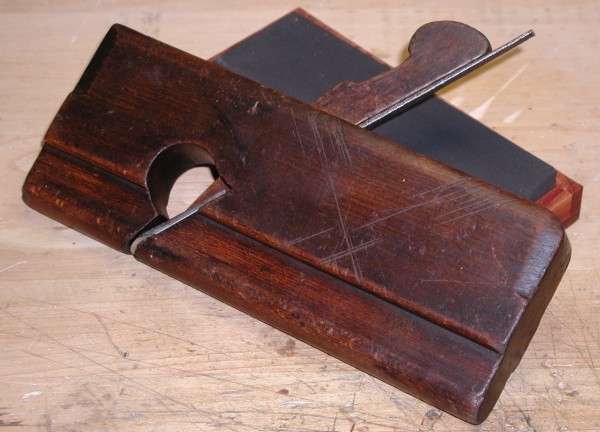
it. The old-time gunsmiths used a special plane very similar to a molding plane to
cut the initial barrel channel. I say initial because the early barrels were tapered
from the breech to a few inches from the muzzle and then flared back out to the
muzzle. These tapered and flared barrels are also known as "swamped"
barrels. For the most historically accurate rifle, you can purchase some very
fine reproduction tapered and flared barrels. However, most reproduction barrels are
straight, and I certainly recommend starting with a straight barrel. I started with
a swamped barrel and it was a big mistake. You should build a couple of rifles with
straight barrels first. There is no reason to make a hard job harder than it
needs to be, at least when you are learning.
How you inlet a barrel depends a lot on the type of barrel and your
tools. Any barrel can be completely inlet with knives, chisels, and
rasps. Some fitting will always need to be done with chisels and
rasps. However, that is the most difficult and time consuming way to do
it. The old-time gunsmiths used a special plane very similar to a molding plane to
cut the initial barrel channel. I say initial because the early barrels were tapered
from the breech to a few inches from the muzzle and then flared back out to the
muzzle. These tapered and flared barrels are also known as "swamped"
barrels. For the most historically accurate rifle, you can purchase some very
fine reproduction tapered and flared barrels. However, most reproduction barrels are
straight, and I certainly recommend starting with a straight barrel. I started with
a swamped barrel and it was a big mistake. You should build a couple of rifles with
straight barrels first. There is no reason to make a hard job harder than it
needs to be, at least when you are learning.
 If you are using a straight barrel, then that initial channel cut with a plane will be 80%
of your inletting job. You will just need to use a square rasp and a dog leg chisel
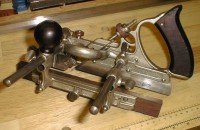
to do the final fitting of the barrel. I have an old Wards #45 (identical to the
Stanley #45) universal plane that I use for cutting the barrel channel and ramrod
groove. You probably don't have a universal plane. For most
people, the barrel channel will have to be cut with knives, gouges, chisels, and
rasps. A shaper or router can serve the same purpose as a plane if you have
one. If you use a plane, router or shaper, be very careful to watch the
run out at the end of the stock. It is very easy to end up with the channel
too wide at the ends. Work very carefully toward the final width and depth of
the channel. Stop often to measure and check your progress. This is not fast
work. The biggest and most important part of building a rifle is inletting the
barrel and ramrod groove and drilling the ramrod hole. Once those things are
done, everything else on the rifle follows from them.
If you are using a straight barrel, then that initial channel cut with a plane will be 80%
of your inletting job. You will just need to use a square rasp and a dog leg chisel
to do the final fitting of the barrel. I have an old Wards #45 (identical to the
Stanley #45) universal plane that I use for cutting the barrel channel and ramrod
groove. You probably don't have a universal plane. For most
people, the barrel channel will have to be cut with knives, gouges, chisels, and
rasps. A shaper or router can serve the same purpose as a plane if you have
one. If you use a plane, router or shaper, be very careful to watch the
run out at the end of the stock. It is very easy to end up with the channel
too wide at the ends. Work very carefully toward the final width and depth of
the channel. Stop often to measure and check your progress. This is not fast
work. The biggest and most important part of building a rifle is inletting the
barrel and ramrod groove and drilling the ramrod hole. Once those things are
done, everything else on the rifle follows from them.
One final word about the tools, only use a router or shaper if you
are very comfortable with these tools. If you are not an expert with these
very dangerous power tools, you will probably ruin your stock and possibly injure
yourself badly. Hand tools are always the safest way to proceed.
 Assuming that you
will cut the barrel channel using hand tools, you should start, as with any
method, by laying out the location of the barrel on the stock blank. The barrel
layout starts with determining the amount of castoff that you want. The castoff is
the distance from the centerline of the barrel projected back to the butt and the
centerline of the buttstock at the butt. For a right-hand rifle, the castoff
would be 1/8" to 1/2" to the right of the centerline of the barrel. This is to
allow the shooter to get his sighting eye right behind the barrel. The centerline of
the barrel and the centerline of the butt will meet just behind the lock mortise.
You will have to play with the location of the barrel until you can get the
amount of castoff that you want. If you have a wide stock, you can keep the
barrel parallel with the sides of the stock. With a thinner stock, the barrel
will have to be laid out diagonal to the sides of the stock in order for you to get your
castoff.
Assuming that you
will cut the barrel channel using hand tools, you should start, as with any
method, by laying out the location of the barrel on the stock blank. The barrel
layout starts with determining the amount of castoff that you want. The castoff is
the distance from the centerline of the barrel projected back to the butt and the
centerline of the buttstock at the butt. For a right-hand rifle, the castoff
would be 1/8" to 1/2" to the right of the centerline of the barrel. This is to
allow the shooter to get his sighting eye right behind the barrel. The centerline of
the barrel and the centerline of the butt will meet just behind the lock mortise.
You will have to play with the location of the barrel until you can get the
amount of castoff that you want. If you have a wide stock, you can keep the
barrel parallel with the sides of the stock. With a thinner stock, the barrel
will have to be laid out diagonal to the sides of the stock in order for you to get your
castoff.
Once you have marked the centerline of the barrel where you need it to be,
you can layout the barrel channel along that centerline. Make sure you leave enough
wood on either side of the barrel to accommodate the thickness of the lock bolster ( the
thick part of the lock plate accommodating the pan ). If you have a straight
barrel, the best way to layout the barrel channel is to use a ruler and measure from the
centerline, 1/2 the diameter of the barrel, and mark that location. After two or
three of these measurements on either side of the centerline, you can use a straight edge
to connect the marks. As an alternative for a barrel laid out parallel to a
square side of the stock blank, you can use a marking or mortise gauge to mark the barrel
channel for inletting. I have a mortise gauge with the cutters filed to a
knife edge that I use for this purpose.
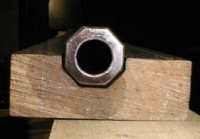
For a swamped barrel, you will need to directly layout the barrel channel
on the stock using the barrel itself. You are going to have to very carefully
layout the barrel channel by tracing along the outside flats of the barrel with a sharp
pencil. A carpenters pencil with one side cut away giving you a long
flat surface (I use my disk sander to sharpen my pencil) to lay up against the flat of the barrel will work best.
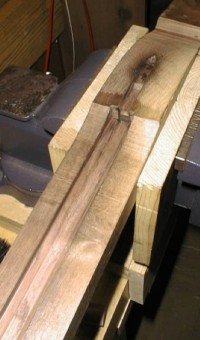
Using the pencil marks as a rough guide, you will need
to partially inlet the barrel using a large radius gouge in order to accurately mark the
outside of the barrel channel for final inletting. During the
pre-inletting, make sure that you stay at least 1/8" inside
your pencil marks. You need enough wood to make a nice clean cut for
the side wall. Having pre-inlet the barrel so the side flats almost
touch the stock, you should use a sharp X-acto type knife with a flat blade and
a straight edge to mark the outside of the barrel channel. Make sure you undercut the barrel slightly to leave a
little bit of wood for final fitting. To undercut the barrel, lay the
knife blade flat against the barrel flat and rotate the blade against bottom
edge of the side flat bringing blade just slightly off the flat. Use your
thumb as a guide to hold the blade in the proper position as you move the blade
along the barrel. Use a good amount of pressure on the blade so that you
are left with a cut that you may easily follow again with the knife once the
barrel is removed.
You will deepen these knife cuts to form the actual side wall of
the barrel channel. Make your additional cuts square with the top of the
barrel channel and take care not to deviate from your original cut. The
deeper the cut, the better guide it becomes for further cuts. Your goal is a barrel channel about 1/32"
undersize. You will take this final 1/32" off with a rasp and/or scraper for a
very tight fit. Once you have cut down as far as you can, make a 30 - 45
degree knife cut into the side wall cut from inside the barrel channel.
This will leave you with a "V" notch to use as a stopping cut for your
gouges and dog leg chisels. Use gouges and dog leg chisels to remove the wood between the knife cuts.
As you remove wood with the chisels, deepen the knife cuts at the side walls of
the channel until you have inlet the bottom half of the side flats.
At that point you will cut a groove in the center of the channel the width
of the bottom flat and down to finished depth of the barrel channel. The finished
depth of the barrel channel will be 1/2 the diameter of the barrel. Once that groove
is finished, you are ready to remove the shoulders left by that channel to form the bottom
diagonal flats. Basically, you cut a two planes connecting the side flats and the
bottom flat. A dog leg chisel is very useful for finishing the bottom
flats. A square rasp with the tang turned up is very useful for evening
out and finishing up the flats. You should use the rasp to square up the side
flats. Always be careful not to remove too much wood. Frequently check
your progress with trial fits of the barrel.
Once you have all the flats roughed in, it is time to start the final fitting of the
barrel. This is done by blackening the bottom of the barrel with soot
from a candle and fitting the barrel into the channel. The high spots in
the channel bottom will be darkened with the soot. You then remove these high
spots with the dog leg chisel and the square rasp. Remember, do this slowly and
check the fit frequently. You will not be able to fit the entire barrel channel at
one time. It is customary to start fitting the barrel at the breech and work
toward the muzzle. During the fitting process, the barrel will
settle into the channel another 1/32" to 1/16".
You should note that my procedure uses a knife to cut in the sidewalls of
the barrel channel. This is not how I was taught to do this by my father nor is it
how most people do this type of inletting. The normal approach as I
was taught would be to use
a flat chisel to make the stopping cuts at the side flats. I had a problem
getting the results I wanted with this method. Consequently, when I saw Chuck
Dixon's method using a knife, I tried it. It has worked much better for me
where I would normally have to make multiple vertical cuts with a chisel along a straight
line. I still recommend a chisel for the straight stopping cuts around the breech
and tang. For short cuts, it avoids accidentally cutting across the intersecting
cut. You will have to figure out what works best for you.
For a little audio-visual instruction, I recommend that you purchase Hershel House's
video, Building a Kentucky
Rifle. You should also try to get a hold of Chuck Dixon's The
Art of Building the Pennsylvania Longrifle or, if you can find it, Recreating
the American Longrifle by Buchelle, Shumway, and Alexander.
This page was last updated on 04/01/05
.
Copyright 1998-2005 by AAAV, LLC
 How you inlet a barrel depends a lot on the type of barrel and your
tools. Any barrel can be completely inlet with knives, chisels, and
rasps. Some fitting will always need to be done with chisels and
rasps. However, that is the most difficult and time consuming way to do
it. The old-time gunsmiths used a special plane very similar to a molding plane to
cut the initial barrel channel. I say initial because the early barrels were tapered
from the breech to a few inches from the muzzle and then flared back out to the
muzzle. These tapered and flared barrels are also known as "swamped"
barrels. For the most historically accurate rifle, you can purchase some very
fine reproduction tapered and flared barrels. However, most reproduction barrels are
straight, and I certainly recommend starting with a straight barrel. I started with
a swamped barrel and it was a big mistake. You should build a couple of rifles with
straight barrels first. There is no reason to make a hard job harder than it
needs to be, at least when you are learning.
How you inlet a barrel depends a lot on the type of barrel and your
tools. Any barrel can be completely inlet with knives, chisels, and
rasps. Some fitting will always need to be done with chisels and
rasps. However, that is the most difficult and time consuming way to do
it. The old-time gunsmiths used a special plane very similar to a molding plane to
cut the initial barrel channel. I say initial because the early barrels were tapered
from the breech to a few inches from the muzzle and then flared back out to the
muzzle. These tapered and flared barrels are also known as "swamped"
barrels. For the most historically accurate rifle, you can purchase some very
fine reproduction tapered and flared barrels. However, most reproduction barrels are
straight, and I certainly recommend starting with a straight barrel. I started with
a swamped barrel and it was a big mistake. You should build a couple of rifles with
straight barrels first. There is no reason to make a hard job harder than it
needs to be, at least when you are learning.